The Citrix NetScaler can be configured to authenticate users against a variety of sources including RADIUS, LDAP, TACACS, and PKI certificates. If you are going to use the NetScaler as an Access Gateway (proxy) between and untrusted network such as the internet and your corporate network, you will probably want to have the NetScaler perform authentication functions.
Configuring the NetScaler for AD authentication is not difficult, but there are a few settings you should watch out for. I was using NetScaler v9.3 for these configuration steps, so other versions may have slightly different options or windows.
1. In Active Directory create a group that the members of which need to be permitted inbound access to your network. For my environment I used AccessGateway_RemoteUser. Create a service account in AD that will be used to bind to Active Directory, such as SVC_NetScaler_Admin.
2. In the NetScaler GUI go to the System folder and click on Authentication. Next, click on the Servers tab, then right click in the window and select Add.
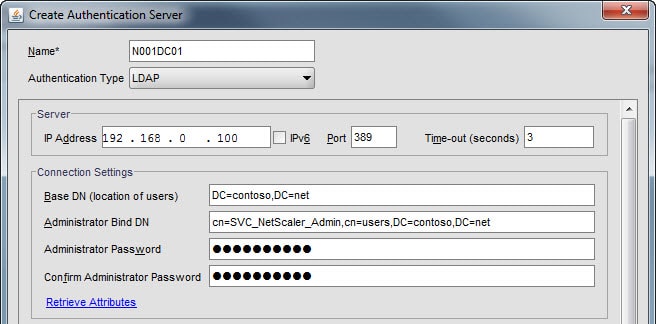
3. Enter a name for this authentication server. I use the hostname of the AD server I’ll be authenticating against. Change the authentication type to LDAP then enter the IP address of your Active Directory server. Don’t configure the port number as we will do that later. Configure the base DN and Administrator bind DN according to your environment, and type in the password for your service account.
4. In the lower half of the window you need to configure the Search Filter and SSO Name Attribute. The search filter maybe a little confusing at first. Open option is using of memberof=cn=

5. At this point you need to configure the security for the LDAP services. The exact configuration will depend on your Domain Controller configuration. The most secure is the SSL option which uses port 636, but your DC must have a server authentication certificate. The next best is TLS, where it uses port 389 but tries to use the LDAP StartTLS command to encrypt communications.
To verify which one will work click on Retrieve Attributes under connection settings and verify a connection can be established. After you know which setting works, click OK. Note that if you use the PlainText option that the NetScaler will disable the ability of users to change expired passwords during the logon process.
6. In the NetScaler GUI go to the Authentication Policies tab, right click in the window and select Add. Input a logical name for the authentication type (e.g. Active Directory), change the Authentication Type to LDAP and pick the server name you just created.
7. In the lower half of the window select True Value from the drop down and click Add Expression. ns_true should now appear in the Expression window.

8. Your configuration should now look very similar to the window below.

9. At this point I would bind this authentication mechanism globally to the NetScaler. To do that you right click in the Policies window and select Global Bindings. Select the policy name from the drop down then click OK.
Now you are ready to rock and roll. NetScaler services such as Access Gateway can now take advantage of your Active Directory authentication services you configured. If you want to provide high availability for your authentication services, you could configure LDAP load balancing as I describe here and use that VIP instead of the IP address of your domain controller back in step 3.


I prefer to use the [email protected] context intead of the full DN for the user. It is simple and thus removes risk of error
Hi,
What rights in AD does the Service Account (i.e SVC_NetScaler_Admin) need please?