One of the common tasks that you may do on a regular basis is installing Windows Server 2012 and you want to automate it as much as possible. Using similar tools to those used with Windows Server 2008 R2, you can create an autounattend.xml file that you inject into the Windows Server 2012 installation ISO for a hands-free install.
The same set of instructions would also work for Windows 8 as well, but you will need to use the Windows 8 install.wim image, and also pay attention to whether you want to automate a 32-bit or 64-bit installation. The autounattend.xml can contain configuration data for both, so only one xml file is needed. If you want to download a pre-configured autounattend.xml file, you can find it here on my Skydrive folder.
1. Download the Windows ADK (Assessment and Deployment Kit) from this link. Never mind that it says Windows 8, as it will work with Windows Server 2012 since they are the same code base.
2. Start the installation process and after a long download select the two options below (Deployment Tools and Windows Preinstallation Environment (Windows PE)). WinPE is technically optional, but in case you need it in the future, I’d install it anyway.
3. After the installation completes go to the Start Menu and select Windows Kits > Windows ADK > Windows System Image Manager.
4. Mount the ISO image of Windows Server 2012, go to the sources directory and copy install.wim to a local drive, such as D.
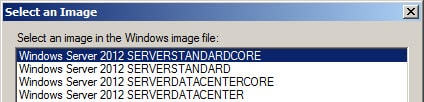
5. From the File menu click on Select Windows Image, find the install.wim you copied, then select the edition that you want to build an answer file for. I selected SERVERSTANDARD.
6. Next it will complain that a catalog cannot be found, so it will build one for you, taking a few minutes. After the catalog is built, from the file menu select New Answer File.
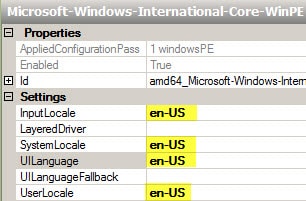
7. Scroll through the Components pane and select amd64_Microsoft-Windows-International-Core-WinPE-_6.2.9200.0_neutral, as shown below, right click, and add to Pass 1.
8. In the Answer File pane click on the component, and fill in the language settings as appropriate. In this case it is configured for US English. You can find a list of the codes here. You also need to configure the SetupUILanguage too.
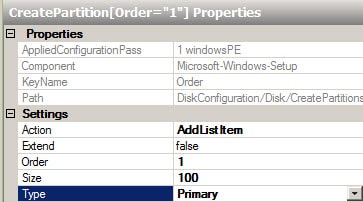
9. Configuring the disk partitions is tedious, but required. To do that, find amd64_Microsoft-Windows-Setup_6.2.9200.0_neutral and add it to Pass 1 as well.
10. In the Answer File pane right click DiskConfiguration and select Insert New Disk. Right click on CreatePartitions and select Insert New CreatePartition. Configure the partition as shown below. This will create a 100MB primary boot partition. Note: The default in 2008 R2 was 100MB, but in 2012 this is now 350MB. I would suggest using 350MB instead of the 100MB in the screenshot.
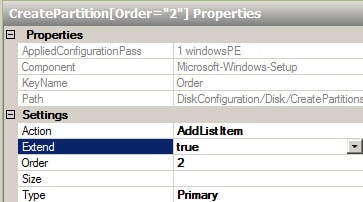
11. Create a second partition, but this time set Extend to true, and don’t configure a size. This will use the remainder of the disk size.
12. In the Answer File pane click on Disk and change the ID to 0 and WillWipeDisk to true.
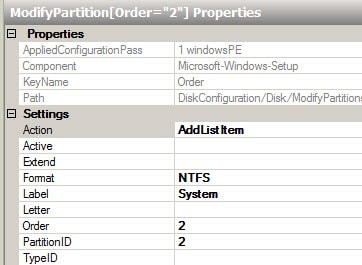
13. Right click on ModifyPartition and select Insert New ModifyPartition. Configure the partition as shown below.
14. Add a second ModifyPartitions and configure as shown below:
15. Drill down to the OSImage option and configure as shown below:
16. Right click InstallFrom and select Insert New Metadata. Configure the metadata as shown below. To determine the proper label just think back to when you opened the Windows image (step 5) and enter the image name exactly as it is listed.
17. Configure the InstallTo and use DiskID 0 and PartitionID 2.
18. Configure the UserData options as shown below.
19. Configure the UserDataProductKey option. The key you use will vary depending on how you are going to activate it (KMS or MAK). You should use the GVLK (generic volume license key) that Microsoft publishes here if you use a KMS server, or your MAK key.
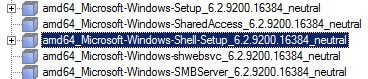
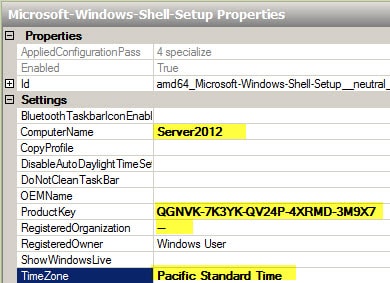
20. Add the amd64_Microsoft-Windows-Shell-Setup_6.2.9200.0_neutral component to Pass 4 specialize.
21. In the Answer File pane click on amd64_Microsoft-Windows-Shell-Setup_6.2.9200.0_neutral and configure the highlighted items below (use the same key as before). You can change the computer name, or leave it blank and it will create a random name upon installation. For a list of timezone values, click here.
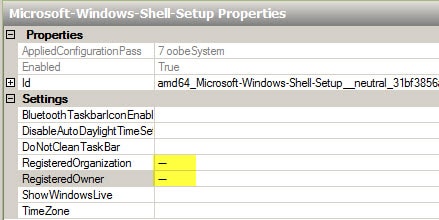
22. Add the amd64_Microsoft-Windows-Shell-Setup_6.2.9200.0_neutral component to Pass 7 oobesystem. In the Answer File pane click on amd64_Microsoft-Windows-Shell-Setup_6.2.9200.0_neutral and configure the highlighted items below.
23. Normally I configure autologon for a count of 2, so my image build process goes quicker and in case I forget the administrator password I configured in the answer file I can reset it during the first two reboots. You will also need to configure the password. Enter a password, and when the answer file is written it will be encrypted.
24. Under UserAccounts, configure the AdministratorPassword with the same password you entered for the AutoLogon information.
25. Save the file as autounattend.xml and verify that no errors are shown in the validation pane. You will see a lot of warnings, but that is normal.
26. Open the Windows Server 2012 ISO image in an ISO editor, like UltraISO. Add the autounattend.xml file to the ROOT of the ISO image. Save the ISO, and then configure a VM or physical server to boot from it and verify that there are no prompts or errors during the installation process. Note that the disk configuration and data will be wiped during the installation process.
Hmmmm… when I boot to my newly created .iso, I get an error message “No images are available.” Any clue to where I might be making my mistake? Great writeup by the way!!
hmmm… my W2012 server boots up, but stops on the Settings: Country/Region page waiting for me to press ‘next’. Any way to skip this page? Thanks Derek!
When installing Windows Server 2012 on VMware ESXi, virtual EFI firmware appears to be a requirement. In place of steps 9 – 14 and 17 above, which are for BIOS firmware, see “Sample: Configure UEFI/GPT-Based Hard Drive Partitions by Using Windows Setup” at http://technet.microsoft.com/en-us/library/hh825702.aspx. I used the “Default UEFI/GTP drive partitions” successfully on ESXi 5.0 U1 (821926). Thanks. Jeff.
Jeffry, Windows Server 2012 and Windows 8 do NOT require UEFI Firmware for installation on ESXi or Workstation. They install just fine using ‘traditional’ MBR means. I actually haven’t tried to install WS2012 in EFI mode, as I don’t think that adds any value for a virtual environment. For a physical server it could, where you can leverage secure boot which needs UEFI.
I’m sure you’re right. I didn’t test BIOS/MBR but was successful with EFI/GPT using the above-referenced partitioning scheme. The VMware KB article “Windows 8 Release Preview and Windows Server 2012 Release Candidate fail when starting for the first time after the installation” at http://kb.vmware.com/kb/2021887 and referenced by the guest OS compatibility guide alludes to the use of EFI firmware. Jeff.
With the RTM versions of 2012/Win8 and the latest ESXi 5.0 build, there are no hang/installation issues that I’m aware of. Beta versions with old ESXi hosts did have issues.
The hang issue I found with ESX 5.0 b821926 and Windows Server 2012 RTM was with the use of a VMXNET3 NIC. While this is said in the compatibility guide to be supported, KB 2006859 states that it is not, and recommends the E1000E as a workaround. My testing confirms this. Anyway I imagine that many of these kinks are worked out in ESX 5.1, which I will be able to test once a compatible version of View is available.
Thanks. I’ll give that a try with the VMXNET3 and PVSCSI drivers. I had previously added them to my WinPE image, but not to the Windows Server 2012 install.wim.
Using the above info from 10/21, confirmed that Windows Server 2012 RTM Datacenter Core installs successfully on ESXi 5.0 b821926 with EFI firmware, GPT disk, pvscsi disk controller, and vmxnet3 NIC.
hello, does anybody know a way to prepare a unattended.xml file for server 2012 that prompts for the computer name? i´m preparing a vm image for deployment and i only get the windows default computername.
I had to purchase ultraISO (was wasting too much time) to make the ISO bootable with the addition of the unattend xml file created. Tested today and windows 2012 deployed from the ISO mounted to VM without any interaction from me at all. GREAT Blog!
Anyone Know how to get this answer file to work in Windows Deployment Server with The boot.wim, install.wim I’ve followed Microsofts Instructions but it doesn’t seem to want to work, still have to fill in the blanks if you know what I mean.
Hello Derek, I am new to the deployment game and am looking for some ideas to get me up and running. I found your post to be extremely helpful in building an answer file. What types of things do you include in your unattend_config.ps1? Also, do each of your “firstlogoncommands” in step 7 happen after a reboot (that is driven by how many reboots you specify in “autologon”)? Any help would be greatly appreciated. Best, Jeff
Had so many issues trying to get Windows deployment services running on windows 2012. Not sure if this helps. Its a collection of info from different sites, and my playing about.
– For testing, I chose the “Respond to all client computers (known and unknown). I guess as the clients were not then _authorised_ – I had to turn on a GPO option, to allow unauthenticated RPC connections. So from ‘group policy management’, edit the ‘default domain policy’/Administrative templates’/system/Remote procedure Call/restrict unauthenticated RPC clients – ENABLE this policy BUT choose ‘NONE’. I rebooted the dc and wds server, then checked resultant set of policy, to ensure the change took affect.
– I absolutely could not get an unattended file working from clicking the image and choosing the option ‘Allow image to install in unattended mode’, I got it working by choosing the option under the main server name, under tab ‘Client’, choosing the x64 – I dont know if the image option had the name wrong, it certainly renamed it to Imageunattend.xml, where as the other server option, left it at unattend.xml – maybe a bug.
– I had issues with choosing the language en-us vs en-gb, even after changing everything back to en-us – it wouldn’t have it, I had to dism mount the install.wim – re-add the en-us back over the top, then it moved on while building, strange.. here are the commands I used.
first mount dism /mount-wim /wimfile:c:\temp\install.wim /index:1 /mountdir:c:\test\offline (where install.wim is the location of your image..you need to first create the mountdir.. then: dism /image:c:\test\offline /Set-AllInt:en-us (I didnt even think you could remove the en-us but something happened to it..) then: dism /unmount-wim /mountdir:c:\test\offline /commit then copy your file back to the source area.
– Kept getting a prompt for language settings, finally worked out its to do with the WDS connection credentials, if you get the credentials correct, then it moves on..i.e. using WSIM add: amd64_Microsoft-Windows-Setup_neutral add to 1 Make sure you ADD the ‘WindowsDeploymentServices’ section, it didnt seem to copy it over to pass1, I had to add it manually – also I had to add the ‘Image selection, and complete that..although I only had a single image I was testing with and therefore didnt see why it would prompt for a select os list, when theres only one Os..
– troubleshooting, press F10 for cmd prompt, the log file is located in c:\windows\panther its called setupact.log
We are trying to deploy “SERVERDATACENTER” instead of the “SERVERSTANDARD” you have selected in your “Select an image” step. But one issue we ran into is after we issued “setup /unattend:e:\autounattend.xml” command in WinPE command window, the first window the setup program pops up is another “Select an image” look-like but instead of 4 options, this time it asks you to select either “SERVERDATACENTER” or “SERVERDATACENTERCORE” which make this “unattend” installation not very “unattend”. Is there something I miss here to make this redundant selection appear on our installation process ? BTW, the unattend installation did go completely fine after I choose “SERVERDTACENTER”. One required end-user involvement is one too many for unattend install. Did you run into similar issue at all with your “SERVERSTANDARD” selection ? Thanks in advance for any reply on this issue.
Great post! As for step 26 and using UltraISO to drop the autounattend.xml into the installation iso, ADK comes with oscdimg.exe that can do that. I used 7-zip (free) to unpack the Windows 2012 iso to C:\Win2012. I dropped the autounattend.xml into C:\Win2012, then change directory to where oscdimg.exe is (cd "C:\Program Files (x86)\Windows Kits\8.0\Assessment and Deployment Kit\Deployment Tools\amd64\Oscdimg") and do: "oscdimg.exe -n -m -b"c:\Win2012\boot\etfsboot.com" c:\Win2012\ c:\Win2012.iso". Boot a VM off of, or make a DVD to boot from, the C:\Win2012.iso just created.
Hey Dan, another method is to use Image Burn (free), and use the tutorial, which just uses the Image Burn GUI to do exactly what you've described. Enjoy. http://forum.imgburn.com/index.php?/topic/11194-h…
Great instructions, thank you, very helpful.
BTW, it doesn't work with the EVAL version of 2012, it cant the images.
once I switched to the full version it worked OK.
1 of 3 Hi, I’m having an issue creating a fully unattended Win 8 Install. I have my wds request approval from all unknown computers, before beginning the windows install. I’ve tried both methods (simply approving, and “name and approve”.) Once I approve, it all goes well until I get the “personalize” and “PC Name” window of installation. I’d like to have that automated as well. Here are my “unattended.xml” and “answer.xml” one for WDS and one for the image, respectively. Please let me know what I need to add or change. Thank you in advance. I have to split up my comments.
I managed to get it working as expected with UltraISO. I'm frustrated with the MagicISO people – it's been two days and they have not responded to my requests for support.
Two questions:
step 5 – I am installing 2012 R2 Essentials and I get no selection box for different versions. Just select install.wim and bam, it's there. How do I get the proper name for step 16?
Is that value really, specifically "/IMAGE/NAME" or should I fill in something like "/Sources/install.wim?"
I am attempting a headless install onto an HP MediaSmart EX490, upgraded to an 8400 CPU and 2GB RAM onto a brand-new 4TB hard drive. I cannot tell where it is stuck, it never even looks like it starts. I am using a bootable USB stick and have verified that it does boot on another PC, launches the installer, and at least begins the autounattend.
Thanks for posting this. It's very helpful information. I do have a problem that perhaps you or one of the readers could help with? I'm using Server 2012 R2. I created an autounattend.xml with my settings in it. I added some things that are not listed above. Specifically I added "Microsoft-Windows-ServerManager-SvrMgrNc", "DoNotOpenServerManagerAtLogon" set to "true" and I added "FirstLogonCommands", "SynchronousCommand" with a script to run. Everything I have configured in the autounattend.xml seem to work fine except for these two things. I've tried adding "Microsoft-Windows-OutOfBoxExperience", "DoNotOpenInitialConfigurationTasksAtLogon" as well and some other things, but still the Server Manager automatically launches during the autologon and none of the Synchronous Commands I add run. I've tried calling all sorts of scripts and batch files using different techniques and even calling executables directly. it just seems to ignore it. Do those only work if you are using a sysprepped image vs a original one?
Hey!
Works as aspected, just one question:
I install Server 2012 R2 Datacenter on a Hyper-V VM.
I mount the ISO and start the VM, but i have to "Press any key to continue".
How can i skip this step for a "real" unattended installation?
Thank for reply! KJV
Extract the Windows Server 2012 ISO image files or otherwise edit the ISO image and make the following changes:
1. rename bootbootfix.bin to bootfix_yesprompt.bin
2. rename efimicrosoftbootcdboot.efi to cdboot_yesprompt.efi
3. rename efimicrosoftbootcdboot_noprompt.efi to cdboot.efi
4. rename efimicrosoftbootefisys.bin to efisys_yesprompt.bin
5. rename efimicrosoftbootefisys_noprompt.bin to efisys.bin
This will remove the "Press any key" prompt when booting on BIOS or UEFI systems.
I am getting the following error during the Copying Files phase.
"Windows Could not set the id for a partition on disk 0. The error occurred while applying the unattend answer file's <DiskConfiguration> setting. Error code:0x80042565"
hello, thanks for this great post. I have done steps 1 to 19, and I am right now at step 20 "Add the amd64_Microsoft-Windows-Shell-Setup_6.2.9200.0_neutral component to Pass 7 oobesystem." I have searched for this image on windows image component and I still can't find it. The only thing showing up is "Add the amd64_Microsoft-Windows-Shell-Setup_6.2.9200.16384_neutral." Please advice on what to do.
hello, thanks for this great post. I have done steps 1 to 19, and I am right now at step 20 "Add the amd64_Microsoft-Windows-Shell-Setup_6.2.9200.0_neutral component to Pass 7 oobesystem." I have searched for this image on windows image component and I still can't find it. The only thing showing up is "Add the amd64_Microsoft-Windows-Shell-Setup_6.2.9200.16384_neutral." Please advice on what to do.
Hi ! Thank you very much for this post. It worked perfectly for me at the first try.
I have a question: Why do we have to define the same values in different component / passes ? I'm talking about the UIlanguage, the RegistredOwner/FullName, The RegistrerOrganization/Organization.


Well written. Thank you for taking the time to put this all together.
Hmmmm… when I boot to my newly created .iso, I get an error message “No images are available.” Any clue to where I might be making my mistake? Great writeup by the way!!
Sorry for my bad english, i'm Chinese.
I get an error message "No images are available." too.
Windows Server 2012 ISO:
9200.16384.WIN8_RTM.120725-1247_X64FRE_SERVER_EVAL_ZH-CN-HRM_SSS_X64FREE_ZH-CN_DV5.iso
Solved:
wrong:
<UserData>
<ProductKey>
<Key>XC9B7-NBPP2-83J2H-RHMBY-92BT4</Key>
<WillShowUI>OnError</WillShowUI>
</ProductKey>
<AcceptEula>true</AcceptEula>
<FullName>vol</FullName>
<Organization>vol</Organization>
</UserData>
right:
<UserData>
<AcceptEula>true</AcceptEula>
<FullName>vol</FullName>
<Organization>vol</Organization>
</UserData>
Anonymous! Sounds like in step 16 you didn’t enter exactly the name of the “image” you wanted to install. Double check your spelling.
hmmm… my W2012 server boots up, but stops on the Settings: Country/Region page waiting for me to press ‘next’. Any way to skip this page? Thanks Derek!
When installing Windows Server 2012 on VMware ESXi, virtual EFI firmware appears to be a requirement. In place of steps 9 – 14 and 17 above, which are for BIOS firmware, see “Sample: Configure UEFI/GPT-Based Hard Drive Partitions by Using Windows Setup” at http://technet.microsoft.com/en-us/library/hh825702.aspx. I used the “Default UEFI/GTP drive partitions” successfully on ESXi 5.0 U1 (821926). Thanks. Jeff.
Jeffry, Windows Server 2012 and Windows 8 do NOT require UEFI Firmware for installation on ESXi or Workstation. They install just fine using ‘traditional’ MBR means. I actually haven’t tried to install WS2012 in EFI mode, as I don’t think that adds any value for a virtual environment. For a physical server it could, where you can leverage secure boot which needs UEFI.
I’m sure you’re right. I didn’t test BIOS/MBR but was successful with EFI/GPT using the above-referenced partitioning scheme. The VMware KB article “Windows 8 Release Preview and Windows Server 2012 Release Candidate fail when starting for the first time after the installation” at http://kb.vmware.com/kb/2021887 and referenced by the guest OS compatibility guide alludes to the use of EFI firmware. Jeff.
Jeffry,
With the RTM versions of 2012/Win8 and the latest ESXi 5.0 build, there are no hang/installation issues that I’m aware of. Beta versions with old ESXi hosts did have issues.
ESXi 5.0 build 821896 works like a charm.
The hang issue I found with ESX 5.0 b821926 and Windows Server 2012 RTM was with the use of a VMXNET3 NIC. While this is said in the compatibility guide to be supported, KB 2006859 states that it is not, and recommends the E1000E as a workaround. My testing confirms this. Anyway I imagine that many of these kinks are worked out in ESX 5.1, which I will be able to test once a compatible version of View is available.
I’ve only used the VMXNET3 NIC, and haven’t had any issues. I wrote an article on how to inject those drivers, and I’ve done about 20 installs with no issues. https://www.derekseaman.com/2012/10/inject-vsphere-drivers-into-windows.html
Thanks. I’ll give that a try with the VMXNET3 and PVSCSI drivers. I had previously added them to my WinPE image, but not to the Windows Server 2012 install.wim.
Using the above info from 10/21, confirmed that Windows Server 2012 RTM Datacenter Core installs successfully on ESXi 5.0 b821926 with EFI firmware, GPT disk, pvscsi disk controller, and vmxnet3 NIC.
hello, does anybody know a way to prepare a unattended.xml file for server 2012 that prompts for the computer name? i´m preparing a vm image for deployment and i only get the windows default computername.
Am I an idiot? I downloaded 2012 standard ISO from Microsoft, mounted the ISO and cannot find install.wim anywhere on the disk? Any help here?
I had to purchase ultraISO (was wasting too much time) to make the ISO bootable with the addition of the unattend xml file created. Tested today and windows 2012 deployed from the ISO mounted to VM without any interaction from me at all. GREAT Blog!
Anyone Know how to get this answer file to work in Windows Deployment Server with The boot.wim, install.wim
I’ve followed Microsofts Instructions but it doesn’t seem to want to work, still have to fill in the blanks if you know what I mean.
Hello Derek,
I am new to the deployment game and am looking for some ideas to get me up and running. I found your post to be extremely helpful in building an answer file.
What types of things do you include in your unattend_config.ps1? Also, do each of your “firstlogoncommands” in step 7 happen after a reboot (that is driven by how many reboots you specify in “autologon”)? Any help would be greatly appreciated.
Best,
Jeff
Had so many issues trying to get Windows deployment services running on windows 2012. Not sure if this helps. Its a collection of info from different sites, and my playing about.
– For testing, I chose the “Respond to all client computers (known and unknown). I guess as the clients were not then _authorised_ – I had to turn on a GPO option, to allow unauthenticated RPC connections. So from ‘group policy management’, edit the ‘default domain policy’/Administrative templates’/system/Remote procedure Call/restrict unauthenticated RPC clients – ENABLE this policy BUT choose ‘NONE’. I rebooted the dc and wds server, then checked resultant set of policy, to ensure the change took affect.
– I absolutely could not get an unattended file working from clicking the image and choosing the option ‘Allow image to install in unattended mode’, I got it working by choosing the option under the main server name, under tab ‘Client’, choosing the x64 – I dont know if the image option had the name wrong, it certainly renamed it to Imageunattend.xml, where as the other server option, left it at unattend.xml – maybe a bug.
– I had issues with choosing the language en-us vs en-gb, even after changing everything back to en-us – it wouldn’t have it, I had to dism mount the install.wim – re-add the en-us back over the top, then it moved on while building, strange.. here are the commands I used.
first mount
dism /mount-wim /wimfile:c:\temp\install.wim /index:1 /mountdir:c:\test\offline
(where install.wim is the location of your image..you need to first create the mountdir..
then:
dism /image:c:\test\offline /Set-AllInt:en-us
(I didnt even think you could remove the en-us but something happened to it..)
then:
dism /unmount-wim /mountdir:c:\test\offline /commit
then copy your file back to the source area.
– Kept getting a prompt for language settings, finally worked out its to do with the WDS connection credentials, if you get the credentials correct, then it moves on..i.e. using WSIM add:
amd64_Microsoft-Windows-Setup_neutral add to 1
Make sure you ADD the ‘WindowsDeploymentServices’ section, it didnt seem to copy it over to pass1, I had to add it manually – also I had to add the ‘Image selection, and complete that..although I only had a single image I was testing with and therefore didnt see why it would prompt for a select os list, when theres only one Os..
– troubleshooting, press F10 for cmd prompt, the log file is located in c:\windows\panther its called setupact.log
Hi,
We are trying to deploy “SERVERDATACENTER” instead of the “SERVERSTANDARD” you have selected in your “Select an image” step. But one issue we ran into is after we issued “setup /unattend:e:\autounattend.xml” command in WinPE command window, the first window the setup program pops up is another “Select an image” look-like but instead of 4 options, this time it asks you to select either “SERVERDATACENTER” or “SERVERDATACENTERCORE” which make this “unattend” installation not very “unattend”. Is there something I miss here to make this redundant selection appear on our installation process ? BTW, the unattend installation did go completely fine after I choose “SERVERDTACENTER”. One required end-user involvement is one too many for unattend install. Did you run into similar issue at all with your “SERVERSTANDARD” selection ? Thanks in advance for any reply on this issue.
Thanks,
Jim
Great post! As for step 26 and using UltraISO to drop the autounattend.xml into the installation iso, ADK comes with oscdimg.exe that can do that. I used 7-zip (free) to unpack the Windows 2012 iso to C:\Win2012. I dropped the autounattend.xml into C:\Win2012, then change directory to where oscdimg.exe is (cd "C:\Program Files (x86)\Windows Kits\8.0\Assessment and Deployment Kit\Deployment Tools\amd64\Oscdimg") and do: "oscdimg.exe -n -m -b"c:\Win2012\boot\etfsboot.com" c:\Win2012\ c:\Win2012.iso". Boot a VM off of, or make a DVD to boot from, the C:\Win2012.iso just created.
Hey Dan, another method is to use Image Burn (free), and use the tutorial, which just uses the Image Burn GUI to do exactly what you've described. Enjoy. http://forum.imgburn.com/index.php?/topic/11194-h…
Great instructions, thank you, very helpful.
BTW, it doesn't work with the EVAL version of 2012, it cant the images.
once I switched to the full version it worked OK.
Very cool !!! I downloaded your .xml file, what is the administrator pwassword ?
Never mind Got it 🙂 Tkx for share, amazing job !!
1 of 3 Hi, I’m having an issue creating a fully unattended Win 8 Install. I have my wds request approval from all unknown computers, before beginning the windows install. I’ve tried both methods (simply approving, and “name and approve”.) Once I approve, it all goes well until I get the “personalize” and “PC Name” window of installation. I’d like to have that automated as well. Here are my “unattended.xml” and “answer.xml” one for WDS and one for the image, respectively. Please let me know what I need to add or change. Thank you in advance. I have to split up my comments.
I can say that I had no luck using MagicISO (http://www.magiciso.com) to create the modified ISO file. When I attempt to boot from that ISO, I get this: http://i.imgur.com/JKoC8w3.png
I managed to get it working as expected with UltraISO. I'm frustrated with the MagicISO people – it's been two days and they have not responded to my requests for support.
Two questions:
step 5 – I am installing 2012 R2 Essentials and I get no selection box for different versions. Just select install.wim and bam, it's there. How do I get the proper name for step 16?
Is that value really, specifically "/IMAGE/NAME" or should I fill in something like "/Sources/install.wim?"
I am attempting a headless install onto an HP MediaSmart EX490, upgraded to an 8400 CPU and 2GB RAM onto a brand-new 4TB hard drive. I cannot tell where it is stuck, it never even looks like it starts. I am using a bootable USB stick and have verified that it does boot on another PC, launches the installer, and at least begins the autounattend.
Hello,
Thanks for posting this. It's very helpful information. I do have a problem that perhaps you or one of the readers could help with? I'm using Server 2012 R2. I created an autounattend.xml with my settings in it. I added some things that are not listed above. Specifically I added "Microsoft-Windows-ServerManager-SvrMgrNc", "DoNotOpenServerManagerAtLogon" set to "true" and I added "FirstLogonCommands", "SynchronousCommand" with a script to run. Everything I have configured in the autounattend.xml seem to work fine except for these two things. I've tried adding "Microsoft-Windows-OutOfBoxExperience", "DoNotOpenInitialConfigurationTasksAtLogon" as well and some other things, but still the Server Manager automatically launches during the autologon and none of the Synchronous Commands I add run. I've tried calling all sorts of scripts and batch files using different techniques and even calling executables directly. it just seems to ignore it. Do those only work if you are using a sysprepped image vs a original one?
Thanks for any help,
Richard
Hey!
Works as aspected, just one question:
I install Server 2012 R2 Datacenter on a Hyper-V VM.
I mount the ISO and start the VM, but i have to "Press any key to continue".
How can i skip this step for a "real" unattended installation?
Thank for reply! KJV
Extract the Windows Server 2012 ISO image files or otherwise edit the ISO image and make the following changes:
1. rename bootbootfix.bin to bootfix_yesprompt.bin
2. rename efimicrosoftbootcdboot.efi to cdboot_yesprompt.efi
3. rename efimicrosoftbootcdboot_noprompt.efi to cdboot.efi
4. rename efimicrosoftbootefisys.bin to efisys_yesprompt.bin
5. rename efimicrosoftbootefisys_noprompt.bin to efisys.bin
This will remove the "Press any key" prompt when booting on BIOS or UEFI systems.
this way works, thanks
I am getting the following error during the Copying Files phase.
"Windows Could not set the id for a partition on disk 0. The error occurred while applying the unattend answer file's <DiskConfiguration> setting. Error code:0x80042565"
Wow, really helpful guide, thank you very much!
hello, thanks for this great post. I have done steps 1 to 19, and I am right now at step 20 "Add the amd64_Microsoft-Windows-Shell-Setup_6.2.9200.0_neutral component to Pass 7 oobesystem." I have searched for this image on windows image component and I still can't find it. The only thing showing up is "Add the amd64_Microsoft-Windows-Shell-Setup_6.2.9200.16384_neutral." Please advice on what to do.
Thanks
hello, thanks for this great post. I have done steps 1 to 19, and I am right now at step 20 "Add the amd64_Microsoft-Windows-Shell-Setup_6.2.9200.0_neutral component to Pass 7 oobesystem." I have searched for this image on windows image component and I still can't find it. The only thing showing up is "Add the amd64_Microsoft-Windows-Shell-Setup_6.2.9200.16384_neutral." Please advice on what to do.
Hi ! Thank you very much for this post. It worked perfectly for me at the first try.
I have a question: Why do we have to define the same values in different component / passes ? I'm talking about the UIlanguage, the RegistredOwner/FullName, The RegistrerOrganization/Organization.
Thanks !
-M
Ask Microsoft…I don't know why. 🙂
Hi, can anyone provide the working version of this xml file with the instructions provided above ?