One of the lesser known SSL certificates in the vSphere 6.0 product is called the VMware Directory Service certificate. This is used by the built-in LDAP server for authentication and encryption. It’s most an internal use only certificate, and one that some customers may not worry about replacing. In fact, per VMware support, a lot of customers probably won’t replace this certificate. But, I’m a certificate whore, and wanted to be thorough in my coverage of vSphere 6.0. You will also see the certificate when you install vCenter 6.0 with an external PSC, and authenticate to the PSC. Even if you use the VMCA, the directory services certificate is not replaced by a trusted certificate.
In addition, the VMware certificate tool does not have a menu option to replace the VMware Directory Service certificate. But don’t fear, I’ve built it into my Toolkit script. What VMware doesn’t do, I do. So in this installment I will show you how to replace the VMdir certificate with either one trusted by your enterprise CA, or issued by the VMCA. The toolkit script will also automate the installation for you, on a Windows PSC. If you are using the VCSA, I’m sorry, but we have to use a manual process provided by VMware.
You should run the Toolkit script on your Windows external PSC, so you have all the files needed locally and it will also automate the installation. If you are using the VCSA PSC, then run this script from a Windows server that has PowerShell 3.0. Use this online procedure if your Microsoft CA will issue the subordinate certificate either with or without approval. This method also supports the VMCA.
If you are using a VMCA as a subordinate, then select menu option 3 to mint your certificates from the VMCA in step 1 below.
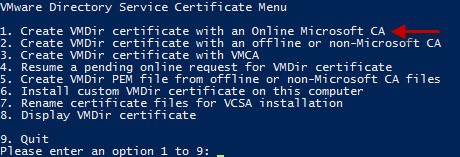
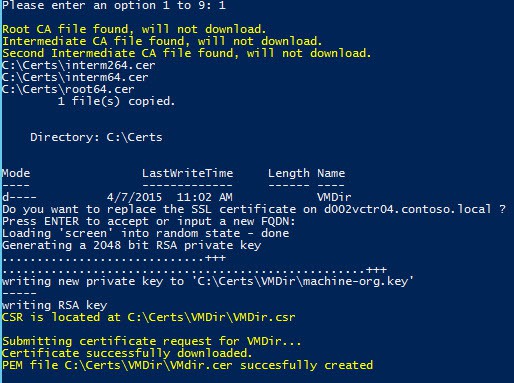
1. Run the Toolkit PowerShell script on your external PSC or a Windows server VM if using the VCSA PSC. Select the VMware Directory Service Certificate menu (option 3). Select the option to create a VMDir certificate with an online MS CA (option 1).
2. Enter the FQDN of the PSC, or press ENTER, if running from the PSC to accept the name. If no certificate approval is needed, the new VMDir certificate will be minted and downloaded.
If your MS CA is configured to require CA manager approval before issuing a certificate, you will see the following:
Have the CA manager approve the request ID, then re-run my Toolkit script and select the “Resume a pending online request for VMDir certificate” (option 4). The script will show you the paths to the chained PEM file and the private key file. After the request is complete, all files are located in C:\Certs\VMDir.
Mint Machine Certificate (Offline)
Use this procedure if your issuing certificate authority is NOT a Microsoft online CA. It could be an offline Microsoft CA, or a non-MS CA as well. This assumes you have the proper templates configured in your CA, per my Part 9 post.
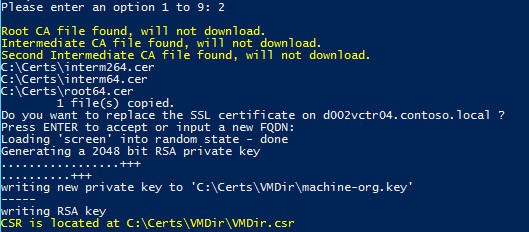
1. Run the Toolkit script and in the VMware Directory Service menu (option 3) select the option to create a VMDir certificate with an offline or non-MS CA (option 2). The script will verify that you have downloaded the root chain certificates.
2. Because I was running this on the external PSC, I just pressed enter for the PSC name.
3. Navigate to C:\Certs\VMDir and upload the VMDir.csr file to your favorite CA and issue a certificate. Download the issued certificate in the base-64 format and save as VMDir.crt in the same folder. You MUST use this file name and it MUST be base-64 encoded. It should only contain the certificate, not a full chain.
4. Re-run the toolkit and from the menu select the option “Create VMDir PEM file from offline or non-Microsoft CA files” (option 5). No input is needed. This will properly create a PEM file with the full certificate chain.
Install VMDir Certificate (Windows PSC)
Note: For this procedure I am showing you how to use my Tookit script to install your VMDir certificate. VMware’s certificate tool does NOT support replacing the VMdir certificate, since not all customers feel the need to replace it. I feel the need. VMware did document the process in their vSphere 6.0 documentation, which is what I implemented in the script.
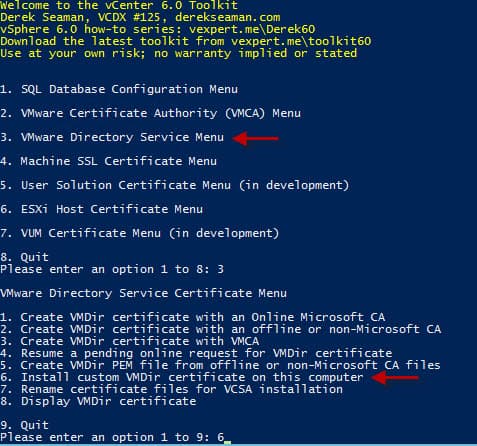
1. Re-run my Toolkit script and in the VMware Directory Service Menu (option 3) select the option “Install custom VMDir certificate on this computer” (option 6).
2. Wait about 30 seconds, and the process will complete without any user input.
Install VMDir Certificate (VCSA)
By this point I’m assuming you have the BASH shell enabled, and know how to WinSCP and SSH into the VCSA. Those steps have been covered in pervious blog posts, so I’m not repeating them here.
1. Run my Toolkit script and on the main menu select VMware Directory Service Menu (Option 3). On the following menu select option 7 to rename the certificate files.
2. SSH into the VCSA and enter the following command:
/bin/service-control –stop VMWareDirectoryService
3. From the C:\certs\Machine directory copy the vmdircert.pem and vmdirkey.pem files to:
In case you want to verify that the VMDir certificate actually was replaced and is using your trusted certificate, my toolkit can do that too!
1. Launch the Toolkit and from the main menu select VMware Directory Service menu (option 3). From there select Display VMDir Certificate (option 8).
2. OpenSSL is invoked to display in a somewhat unfriendly manner, the SSL certificate used for the LDAP services. Review the properties to ensure they contain those from your trusted CA.
Summary
While not a popular certificate to replace, replacing the VMware Directory Service certificate does its place. Since the Toolkit makes is so easy to do, I’d recommend replacing it as a matter of practice. This will eliminate a somewhat worrisome certificate validation pop-up during the vCenter installation process. Instead of seeing an untrusted certificate, you will see your freshly minted VMDir certificate.


 Install VMDir Certificate (VCSA)


